Web制作、Web開発の歩き方

エンジニアにも使いやすいFigma入門

■第2話:基本色とフォントを設定しよう

(最終更新日:2024.03.25)

Figmaのイメージ
この記事は5分で読めます!
(絵が小さい場合はスマホを横に)

「まずは何からやればいいの?」
新しくデザイン系のツールを使う際、まず何から始めれば良いか分からないというのはよくあることである。 覚えるのが苦手な人にも、なるべく分かりやすくなるように説明したいと思う。 今回から数回に分けて、スマートフォン用サイトのWebデザインを作るために必要な順序を説明する。 順を追って覚えれば、特に難しいことはないはずだ。


1.画面サイズの設定

まずは、ログイン後の初期画面でdraft(下書き)を選択し、「+デザインファイル」ボタンを押して、デザインを新規作成しよう。 これで作成用の画面が表示される。画面を開いたら、①適当にファイル名(ここではiPhone14用)を付けて保存しよう。 ファイル名は、真ん中上部の下書きの横をクリックすることで変更できるようになる。

次に画面サイズの大きさを決めよう。②左上の#ボタン(フレーム)を押すと、 右側のタブでプロトタイプを選ぶとターゲット端末の画面サイズを選択できるようになる。

③ここではiPhone14を選んだ。選ぶと画面作製用の白いフレームが表示され、Webサイトのデザインを構築していくことができる。 スマートフォンは縦にスライドさせて使うことが前提なので、予め縦方向に伸ばしておいても良いだろう。 これでWebサイトのデザインを作成する準備ができた。

メインフレーム(iPhone14)作成

2.基本色の設定

いきなり中身の作成に入る前に、今回作成するデザインの基本色を決めよう。 3色~4色で基本色を決めるのが良い。相性の良い組み合わせというのも大体決まっている。 ある程度デザインに慣れているプロ以外は、決まってる基本色で作ろう。 こちらのColor Huntから、 自分のイメージにあった色の組み合わせから選んで決めてしまうのが良いだろう。 3~4色のイケてる色の組み合わせを選択することができる。 そこから明るさ等をイメージに合うように調整するのは有りだ。

今回はColorHuntでSummerにあった色を選択した。 Figma上にColor Palletというフレームを自分で作成し、円形で先ほどのSummerの内の3色を保存した。 ただし、ベースカラーだけは背景色となるので、薄さを20%に変更した。

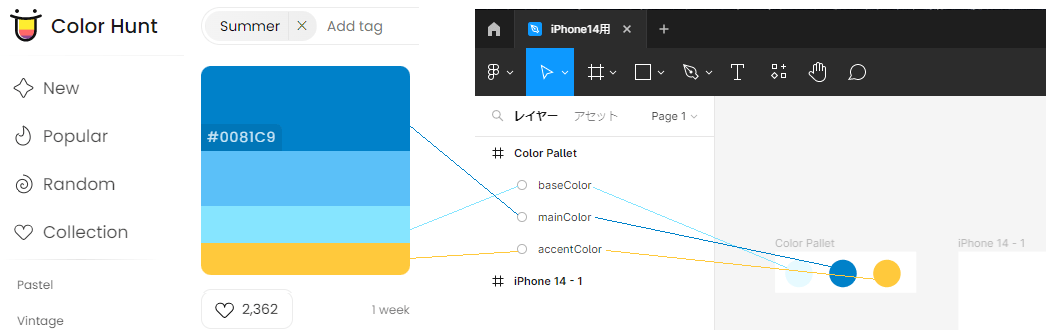
Color Huntで色を選ぶ(左)、FigmaでColor Palletを作成する(右)

そして、Color Palletを作ったら、その色をカラースタイルとして登録しよう。 Color Palletをマウスで選択すると、右端の表示に「塗り」という項目が表示される。 ①「塗り」の四つの点マークを押し、色スタイルで「+」ボタンを押そう。新しい色のスタイルの作成で名前を付け、 スタイルの作成を押せば、その色がカラースタイルとして登録される。
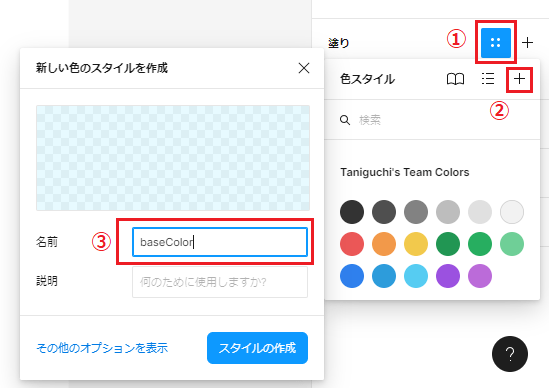
カラースタイルの登録

このような煩わしい手順を踏んでまでも、カラースタイルに登録すると何が良いかというと、いつも同じ色を名前を指定しただけで使えるということである。 加えて、例えば後からmainColorを変更したいという場合に、mainColorのスタイルを変更すれば、その色に充てていた部分を一括で変更することができる。 プログラミングで言う定数の変更のようなものである。つまり、カラースタイルを登録すると、デザインの変更や保守がしやすくなる。 最初は仮で良いので、3色のカラースタイルを決めてしまおう。

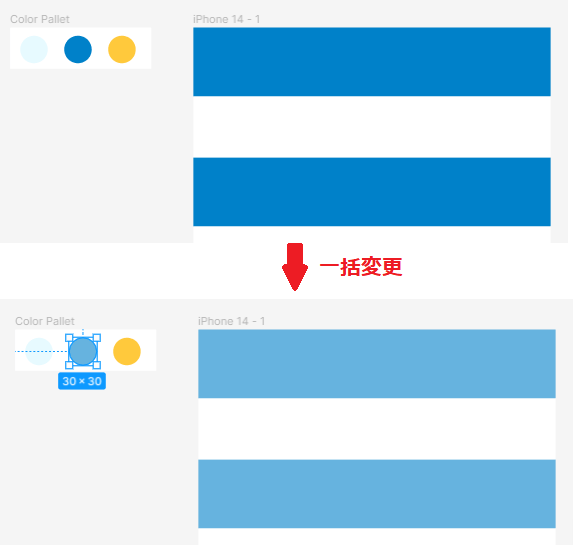
カラースタイル自体を変更して、まとめて変更した例

3.フォントの設定

「見出し」で使う文字の大きさとスタイル、「文章」で使う文字の大きさとスタイル、 統一感のあるデザインにするのであれば、こちらも最初に決めておきたい。 Color Palletの場合と同様に、まずFontというフレーム(下図の左上部分)を作成しよう。 作成したら、テキストスタイルを決めよう。 ここでは白抜きの場合の見出し(titleWhite)、黒文字の見出し(titleBlack)、コンテンツ(Content)の三つのテキストスタイルを作成した。 作成方法は、前項のColor Palletとほぼ同様である。①対象の文字を選択し、②スタイルを追加するボタンを押し、③名前を決める。 テキストスタイルもカラースタイルと同様、一括変更が可能である。これで、今回作成するサイトの色と文字のデザインが決まった。

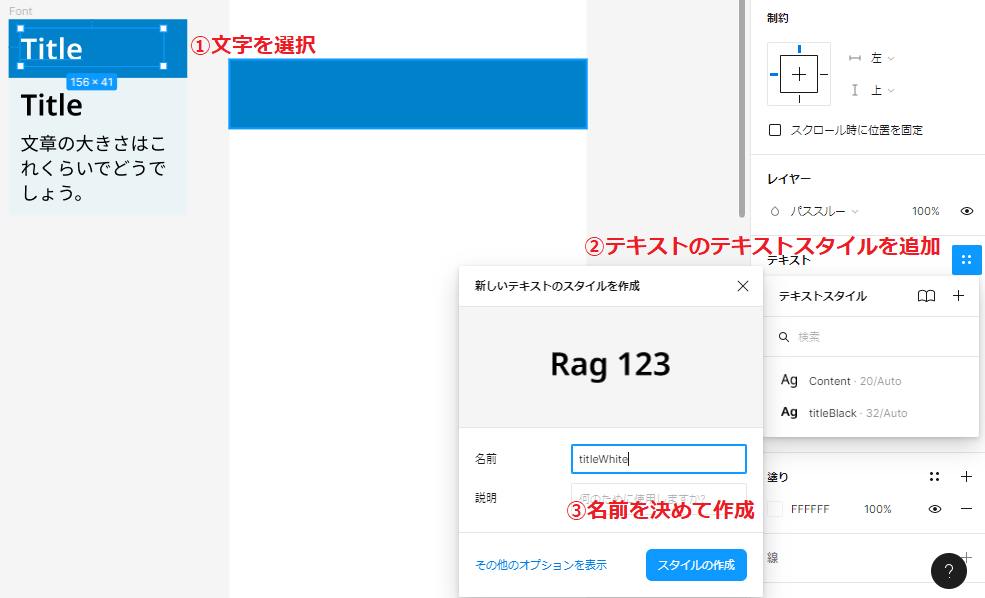
Fontフレームを作成し、テキストスタイルを登録する

4.まとめ

今回はFigmaにおける画像サイズの設定、基本色の設定、フォントの設定を行った。 Color PalletやFontのフレームはわざわざ作らなくてもデザインを作ることはできる。 しかし、フレームを作ることで基本色、Fontの変更がしやすくなるので、絶対に作成した方が良い。 第三者が見ても、どこを直せばよいかが分かりやすくなる。デザインの再利用も簡単だ。

今回設定したベーススタイルは、Webデザインにおいて非常に重要な要素である。 顧客に与えたい印象を変えないためにも、基本スタイルを最初に設定しよう。

▼参考図書、サイト

   Figma公式サイト figma.com
   エンジニアのためのアプリUIUXデザイン入門〜心地よいユーザーインターフェースは初心者でも作れる〜 Udemy
   Figmaの使い方 「完全攻略」 基本編を分かりやすく解説!【2022年最新版】 Uチャンネル(YouTube)

Figma Guide for Engineers ■ Episode 2: Setting Base Colors and Fonts (Last updated: 2024.03.25) Image of Figma This article takes about 5 minutes to read! (Rotate your phone sideways if the images are too small) "Where should I start?" When using a new design tool, it’s common to not know where to begin. This guide aims to explain things as clearly as possible, especially for those who don’t like memorizing steps. Starting with this article, we’ll explain the steps needed to design a smartphone website over several parts. Follow the steps and it won’t be difficult. [Contents] Set Screen Size Set Base Colors Set Fonts Summary 1. Set Screen Size After logging in, choose "Drafts" and click the “+ Design File” button to create a new design. A new design screen will open. ① Save the file with an appropriate name, such as "iPhone14 Design". You can change the file name by clicking next to “Draft” at the top center. ② Then, click the # (frame) button at the top left. On the right tab, select “Prototype” to choose a target device size. ③ In this case, we selected iPhone14. A white frame will appear for building the site layout. Since smartphone sites scroll vertically, you can extend it downward from the start. Create Main Frame (iPhone14) 2. Set Base Colors Before designing the content, decide on the base colors. Choosing 3–4 matching colors works best. Unless you’re a pro, it’s best to use existing color palettes. Try Color Hunt to find combinations that match your image. We selected a palette called “Summer”. On Figma, we created a "Color Pallet" frame with three circular swatches. The background color was set to 20% opacity for subtlety. Choose from Color Hunt (left), create Color Pallet in Figma (right) Once you have the Color Pallet, register those colors as Color Styles. Select the circle, click the four-dot icon under “Fill” on the right, then click “+” in Color Styles. Give it a name and save it. The advantage is reusability—just call the style by name. If you later want to change the main color, editing the style updates all instances automatically. It’s like updating a constant in programming. Register Color Style Defining Color Styles helps with design updates and maintenance. Even if temporary, set at least three styles to begin with. Example of updating all at once by modifying Color Style 3. Set Fonts Set the text size and style for “Headings” and “Body Text” early on to maintain consistency. Create a "Font" frame (top left of the image below). Then create Text Styles—titleWhite (white heading), titleBlack (black heading), and Content (body). Like colors, select the text, press the style + button, name it, and save. These styles can also be batch updated later. Create Font Frame and Register Text Styles 4. Summary In this guide, we configured screen size, base colors, and fonts in Figma. While it’s possible to proceed without Color Pallet or Font frames, having them improves maintainability. It also makes it easier for others to understand and reuse your design. These base styles are vital in web design. Set them first to ensure the look and feel of your site remains consistent for your users. ▼References   Official Figma Website — figma.com   UI/UX Design for Engineers: Build Clean Interfaces Even as a Beginner — Udemy   Figma Basics Explained Clearly [2022 Edition] — U Channel (YouTube)