Web制作、Web開発の歩き方

初心者のためのDjango入門

■第5話:Djangoのメール送信機能

(最終更新日:2023.07.27)

Djangoフレームワークのイメージ
この記事は5分で読めます!
(絵が小さい場合はスマホを横に)

「メール送信って難しい?」

Django(Python)は、PHPと同じく関数(send_mail)を用いる方法とクラス(EmailMessage)で送る方法、2種類のメール送信方法がある。 今回はその2つの方法について解説したいと思う。 中でもクラスで送る方法は、bccの設定や添付ファイルの設定などを簡単にできるので、おすすめである。 メールが使えれば、会員登録のメール認証やアラートを知らせる機能など、使いどころは多い。ぜひ活用してみよう。


1.Djangoのメール設定(setting.py)

第4話のDjangoの設定の項目でも説明したが、メールを送信するには、まずsetting.pyに設定を記述する必要がある。

setting.pyに記述すべき情報を知るため、まずはメールサーバーをチェックしよう。 ここではStarServerのメールサーバーを例として用いる。 チェックするのはメールアドレス(EMAIL_HOST_USERに相当)、SMTP(EMAIL_HOSTに相当)、ポート番号である。 他のレンタルサーバーの会社、クラウドサービスの会社でも調べれば同様の情報は手に入るはずである。

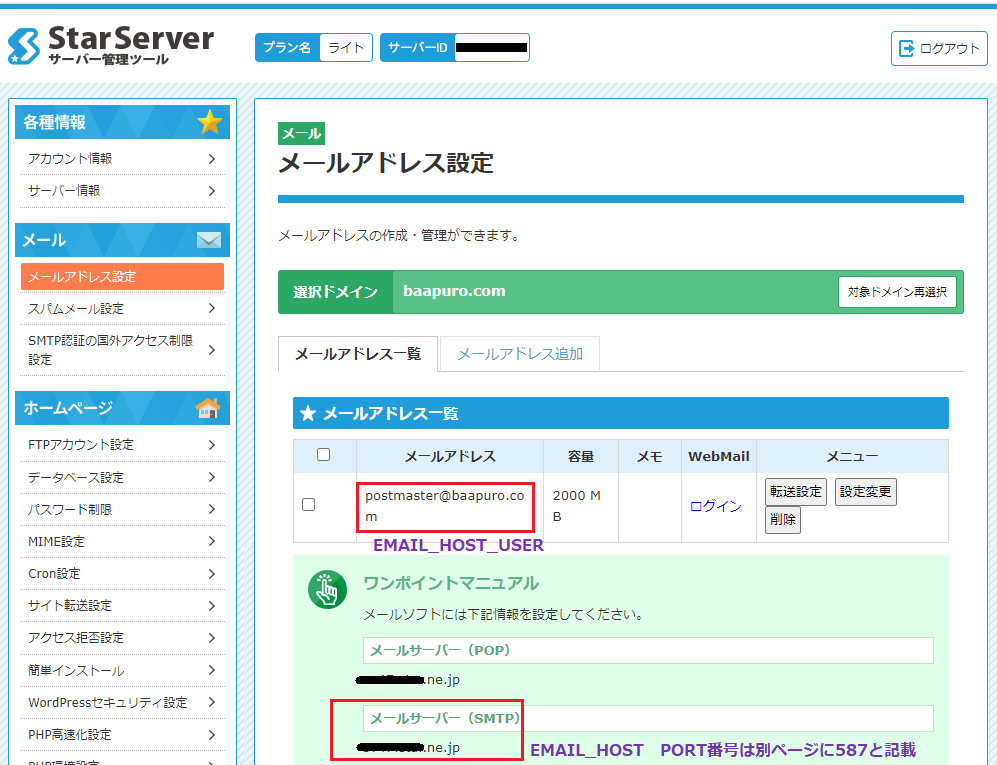
メールサーバーで見るべき項目(Star Serverの場合)

setting.pyにあるEMAIL_BACKENDはテスト環境の場合はconsole.Emailbackend(下記のコメント部分)を使い、実際送信する場合はSMTPを使う。 そしてEMAIL_HOSTは、先ほどのレンタルサーバーで取得したメールサーバーを指定する。 ポート番号は、先ほど確認した番号(ここでは587)を記述する。 EMAIL_HOST_USERは取得したメールアドレス、EMAIL_HOST_PASSWORDはメールのログインパスワードを使う。 EMAIL_USE_TLSは文章を暗号化するかどうかなので、ここは必ずTrueにしよう。これで、メールを送る準備は整った。 あとは関数やクラスで送る命令を準備するだけである。
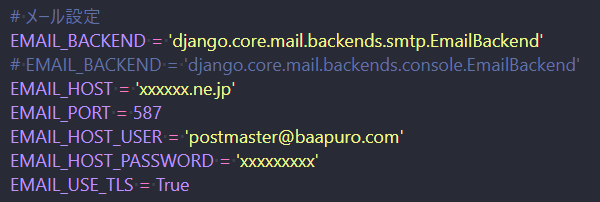
setting.pyにおけるメール設定

2.send_mail関数で送る方法

先にsend_mail関数で送る方法を説明する。具体的なコードは以下に示す通りである。

send_mail関数の引数はそれぞれ、subject(題名)、message(メッセージの内容)、sender(宛先)、email_list(送り先、複数可)である。 これをDjangoのviewクラスや関数として組み込み、用いる。 下記の例では、会員登録Formを受け取るview関数内でsend_mailを実行した記述である。 Formで送信された内容(登録手続きされた内容)に沿って、メールを送るように設定している。
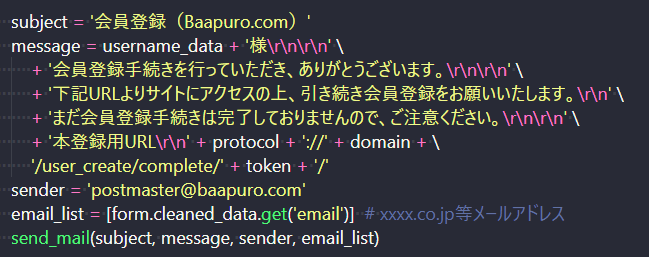
send_mailの具体例

また、内容の異なるメール複数を一括で送りたい場合、send_mass_mailという関数で実行することができる。 send_mailと殆ど同じだが、 send_mail部分を

mail1 = (subject, message, sender, email_list)
mail2 = (subject, message, sender, email_list)


という形で一旦タプルにする。このタプルを、send_mass_mail(mail1, mail2)という形でsend_mass_mail関数に組み込み、 複数一気に送ることができる。1件1件send_mailで送っても良さそうだが、 send_mass_mailで送った方がメールサーバーへのコネクションが一回で済み、負荷が少ない。 こちらの方法も覚えておこう。

3.EmailMessageクラスで送る方法

上記で説明した関数を用いる方法では、ccの設定をしたり、添付ファイルを送ることはできない。 これらの設定をしたい場合は、EmailMessageクラスを用いる。 EmailMessageクラスの使い方は以下のコードに示す通りである。 各種引数に関しては、django公式ドキュメントを参照してほしい。 このクラスを用いることで、cc, bccの設定や、attachで添付ファイルを指定することができる。 実際、指定して送信した例が下右図の通りになる。添付ファイル(画像)も送信されていることが分かる。 ccや添付ファイルを用いる場合は、こちらのクラスを使用しよう。

(余談だが、簡単なテストメールを送る際は「python manage.py shell」と入力し、 シェルで実行した方が簡単に送信テストできる。今回のEmailMessageクラスの実行も、これでテストをしてから実装した)

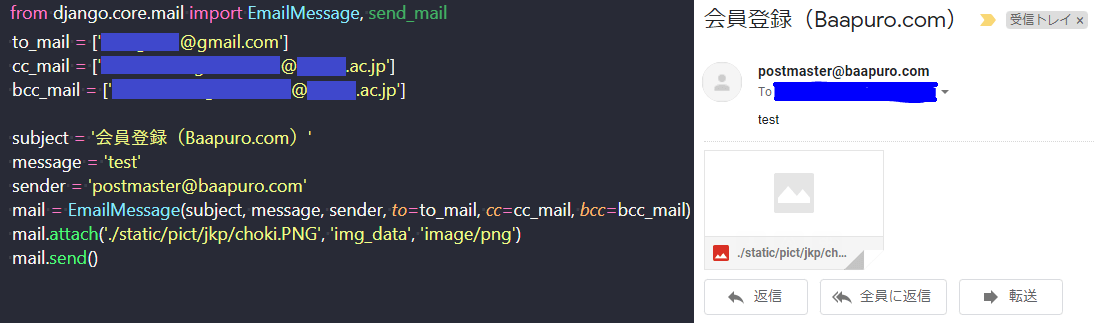
EmailMessageクラスによるccの指定と添付ファイルの設定

4.まとめ

今回はDjangoのメール送信機能を紹介した。2種類の方法を紹介したが、基本的にはClassで実装した方が良いだろう。 メール送信機能は会員登録の確認や問い合わせなど、Webサービスを運営する上で欠かせない。是非、使いこなせるようになろう。


▼参考図書、サイト

 「Djangoのツボとコツがゼッタイにわかる本」 大橋亮太 秀和システム
   Sending email  django公式Document
   【Django】簡単にメール送信機能を追加する方法(単一送信・複数送信・ファイル添付) OFFICE54


Introduction to Django for Beginners ■Episode 5: Django Email Sending Feature (Last updated: 2023.07.27) Django framework image This article takes about 5 minutes to read! (If the images are small, try rotating your phone sideways) "Is sending email difficult?" Django (Python) offers two main ways to send emails: using a function (`send_mail`) or a class (`EmailMessage`). In this article, we’ll explain both methods. Among them, the class-based approach is highly recommended as it allows easy setup for things like BCC and attachments. With email capabilities, you can implement features like email verification for registration or alert notifications. Be sure to make full use of it. [Table of Contents] Django Email Configuration (setting.py) Using send_mail (Function) Using EmailMessage (Class) Summary 1. Django Email Configuration (setting.py) As explained in Episode 4’s Django settings, you need to configure `setting.py` before sending emails. To determine the required settings, first check your mail server. In this example, we’ll use StarServer’s mail server. The required information includes your email address (EMAIL_HOST_USER), SMTP server (EMAIL_HOST), and the port number. You should be able to find similar details with other hosting or cloud providers. Key items to check on the mail server (StarServer example) For `EMAIL_BACKEND` in setting.py, use `console.EmailBackend` for test environments (as shown in the comment section below), and use SMTP for actual email sending. `EMAIL_HOST` should be set to your server’s SMTP, and `EMAIL_PORT` to the appropriate port number (587 in this case). `EMAIL_HOST_USER` is your email address, and `EMAIL_HOST_PASSWORD` is your email login password. `EMAIL_USE_TLS` should be set to `True` for encryption. With these settings in place, you are ready to send emails—just implement the actual commands using either function or class. Email settings in setting.py 2. Sending Emails with send_mail Function First, let's look at how to use the `send_mail` function. Below is a sample code. The parameters are `subject`, `message`, `sender`, and `email_list` (which can contain multiple recipients). Typically, this is integrated into a Django view function or class. In the example, the email is sent within a view function that processes a registration form. The email content is generated based on the form submission. send_mail example If you want to send multiple emails with different content in one go, you can use the `send_mass_mail` function. It works similarly to `send_mail`, but you first define tuples like: mail1 = (subject, message, sender, email_list) mail2 = (subject, message, sender, email_list) Then pass them to: send_mass_mail((mail1, mail2)) Using `send_mass_mail` is more efficient as it uses only one connection to the mail server, reducing the load compared to calling `send_mail` multiple times. 3. Sending Emails with EmailMessage Class The function-based approach doesn’t support setting CC or attaching files. If you need these features, use the `EmailMessage` class instead. Below is a code example. For details on each parameter, refer to the official Django documentation. With this class, you can easily set CC, BCC, and add attachments using `attach()`. The image below shows a successful example with an image file attached. (Tip: To test sending emails quickly, open a Django shell using `python manage.py shell` and try the class there before integrating it into your project.) Example of using EmailMessage with CC and attachments 4. Summary In this article, we introduced Django’s email sending functionality. Although both function and class methods are available, the class-based approach is generally more flexible. Email functionality is essential for web services—whether for registration confirmation, inquiries, or alerts. Make sure to master it! ▼References  “Django no Tsubo to Kotsu ga Zettai ni Wakaru Hon” by Ryota Ohashi – Shuwa System   Sending email – Official Django Documentation    [Django] How to Easily Add Email Sending Functionality (Single, Multiple, Attachments) – OFFICE54